


How to Test Your Garage Door Safety Features in 10 Minutes

Key Takeaways
1. Every residential garage door manufactured since 1993 includes two federally required garage door safety features: an auto-reverse mechanism and photoelectric (photo-eye) sensors.
2. Both safety features of your garage door should be tested monthly using simple objects like a two-by-four and your hand, and the entire process takes about 10 minutes.
3. Raynor Door Authority is a Raynor garage door dealer with certified technicians who can inspect, calibrate, or replace any safety component that fails the monthly test.
Why You Should Test Your Garage Door Safety Features Every Month
Your garage door is the largest moving object in your home. A standard residential door weighs between 130 and 350 pounds, and a poorly maintained one can close with enough force to seriously injure a child, pet, or adult.
The Door & Access Systems Manufacturers Association (DASMA) recommends monthly inspection and testing of your garage door and opener system as part of your regular routine. According to the U.S. Consumer Product Safety Commission, thousands of garage door-related injuries occur each year, and most serious incidents involve safety features that had stopped working but were never tested.
The good news is that testing your garage door safety features is quick and simple. Most homeowners can complete the full inspection in under 10 minutes.
What Are the Required Safety Features of Your Garage Door?
Federal law (16 CFR 1211) has required two specific safety features on all residential garage door openers manufactured after January 1, 1993. Both must work for your door to be considered safe.
| Safety Feature | What It Does | How It Works |
|---|---|---|
| Auto-Reverse Mechanism | Reverses the door when it contacts an obstruction | Detects pressure or resistance when the door closes on an object, then immediately reverses direction |
| Photoelectric Sensors (Photo-Eyes) | Stops and reverses the door when something breaks an invisible infrared beam | Two sensors mounted 6 inches above the floor on either side of the door create a beam across the opening |
If your opener was manufactured before 1993, it likely lacks these features and should be replaced. Modern openers also include additional safety components such as manual release cords, rolling code remotes, and motion-detecting lights.
How to Test Your Garage Door Auto-Reverse Mechanism
The auto-reverse mechanism is your backup safety system. It activates when the door physically contacts an object during closing. Test it monthly with this simple procedure.
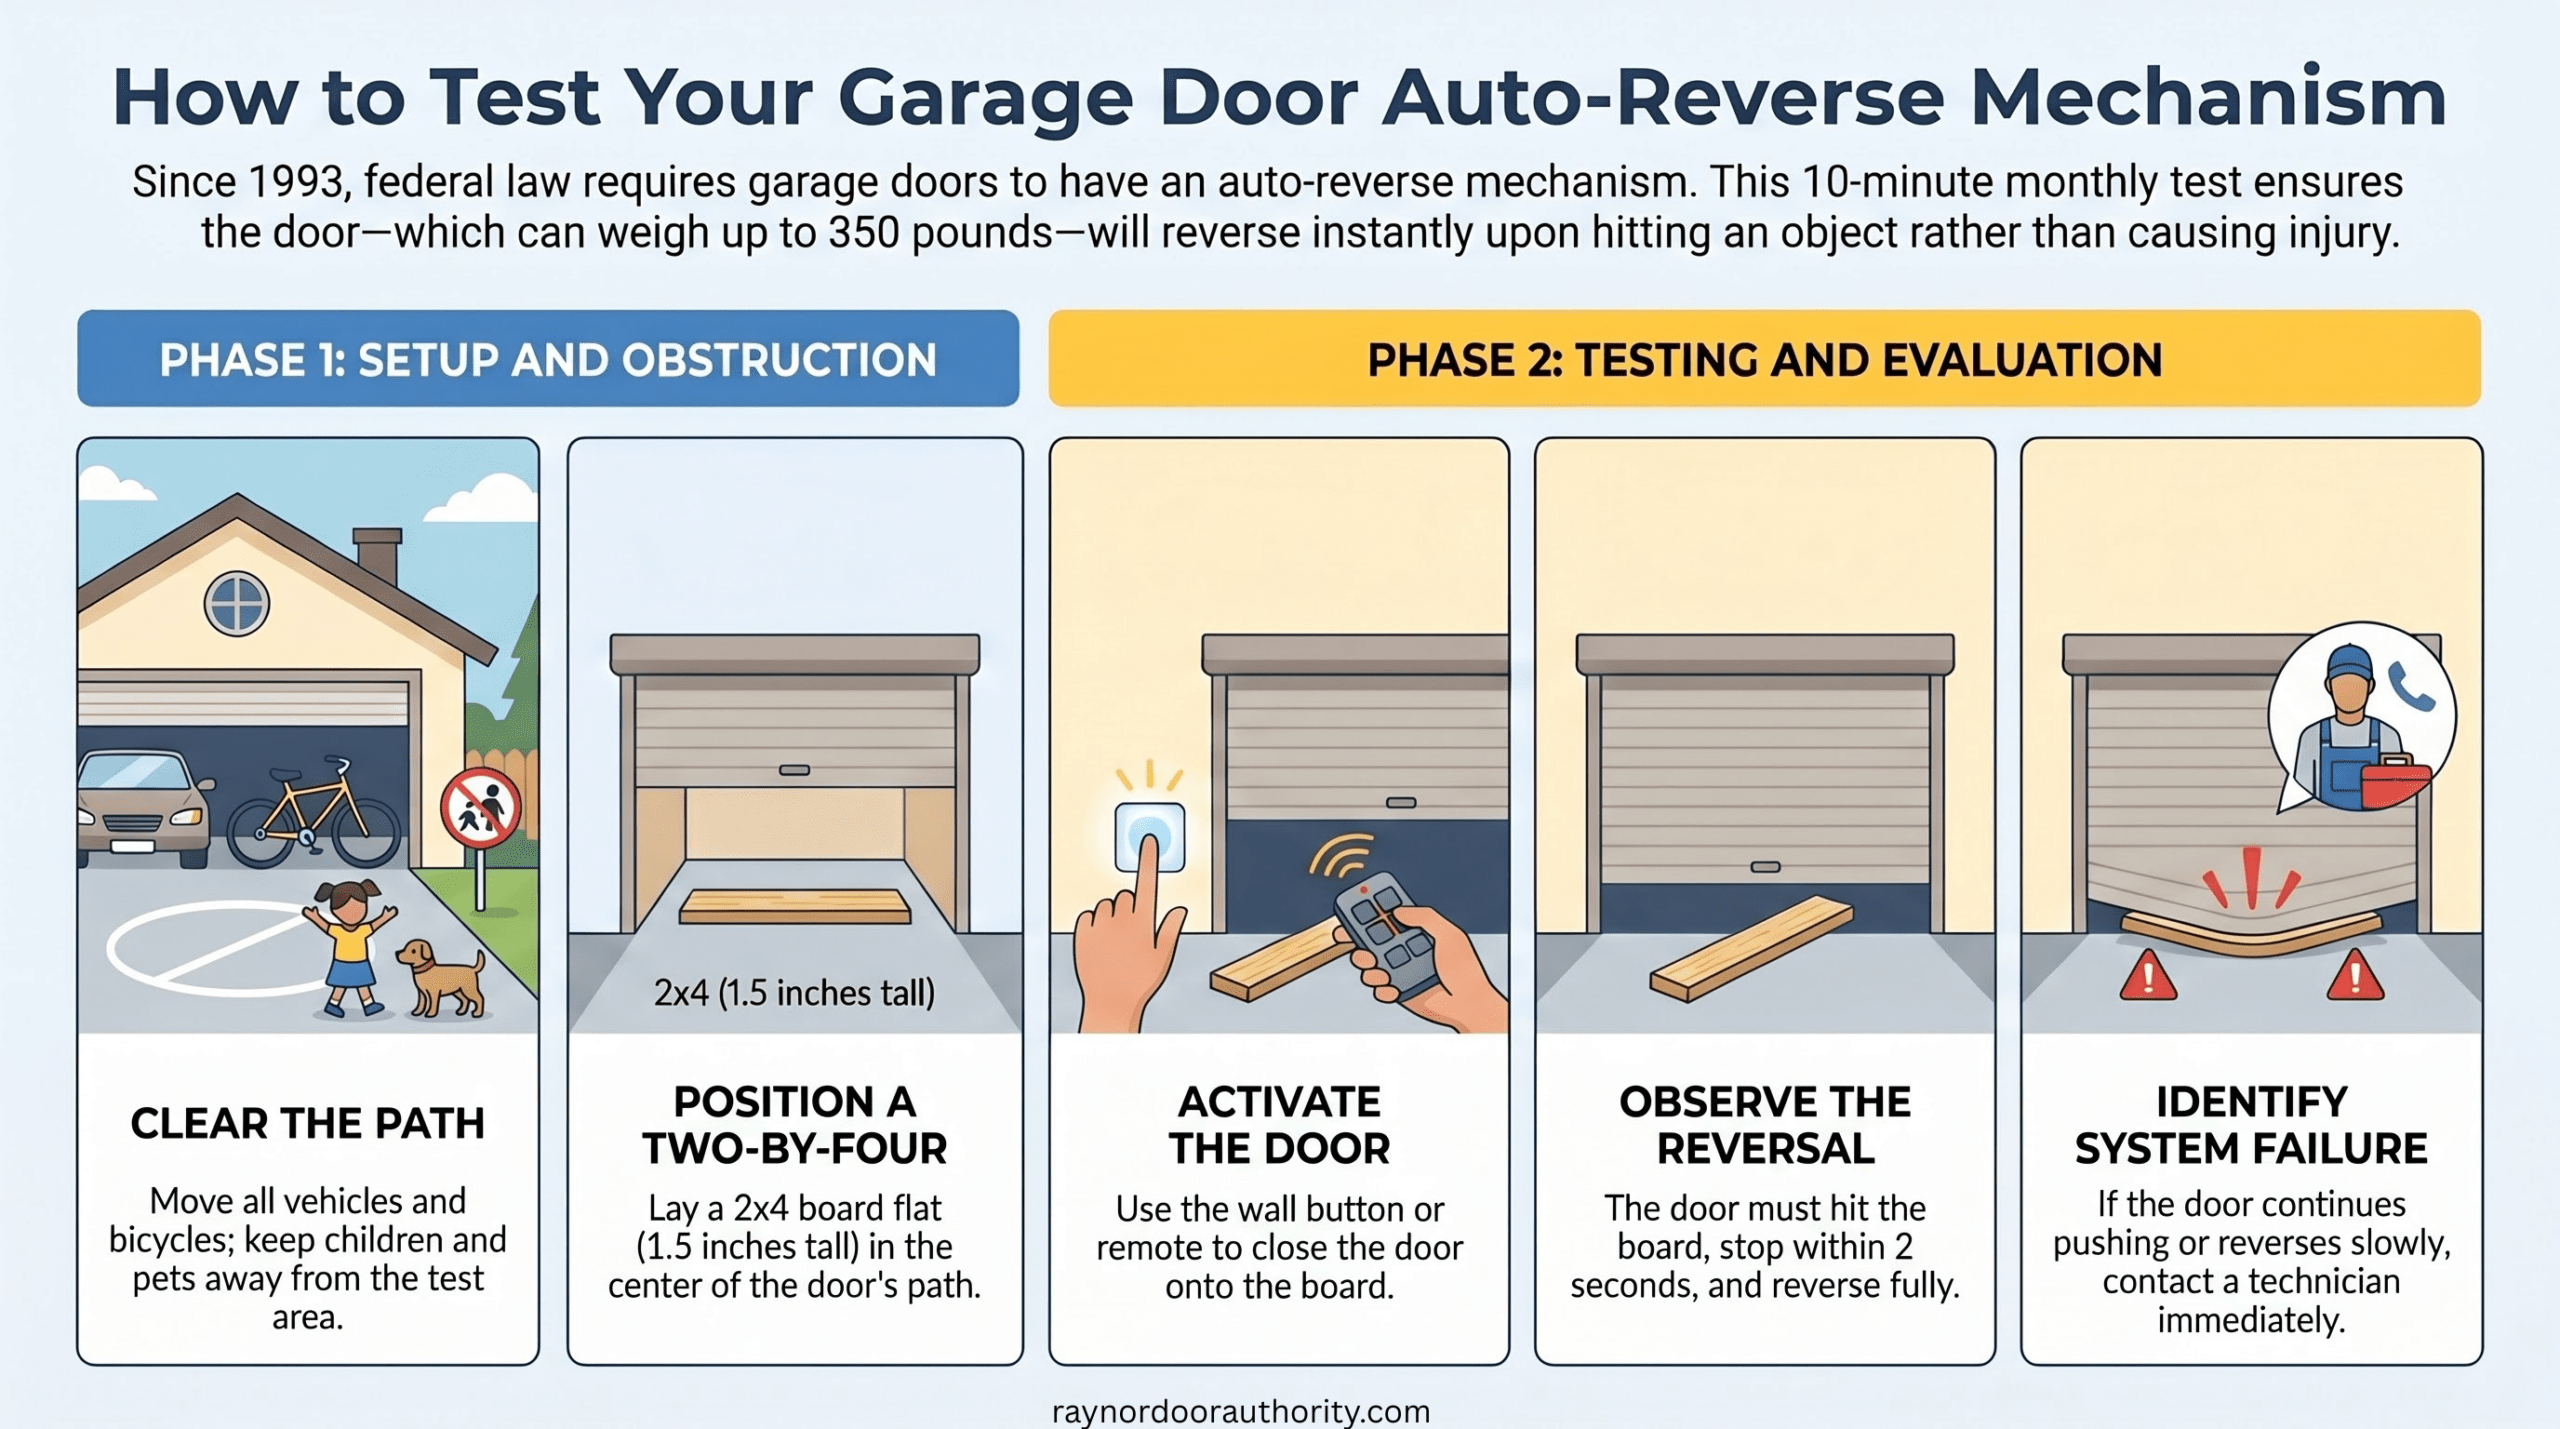
Step 1: Clear the Area
Move all vehicles, bicycles, and other items out of the door’s path. Keep pets and children away from the test area.
Step 2: Place a Two-by-Four
Set a 2×4 board flat on the garage floor directly in the center of the door’s path. The board should be lying flat (1.5 inches tall), not standing on edge.
Step 3: Activate the Door
Press your wall button or remote to close the door. Watch as it descends.
Step 4: Observe the Reaction
The door should make contact with the 2×4, stop within 2 seconds, and immediately reverse to the fully open position.
What success looks like: Quick, decisive reversal the moment the door touches the board.
What failure looks like: The door continues pushing downward, reverses slowly, or fails to reverse at all. Any of these means the auto-reverse mechanism needs adjustment or repair.
If your door fails this test, do not use the automatic opener until a qualified technician has inspected and repaired it.
How to Test Your Garage Door Photo-Eye Sensors
Photo-eye sensors are your first line of defense. They prevent the door from ever touching an obstruction by detecting anything that breaks the infrared beam across the opening.
Step 1: Locate the Sensors
The two sensors are mounted approximately 6 inches above the garage floor on either side of the door opening. Each unit has a small LED light. Most manufacturers use steady green or amber lights to indicate proper alignment.
Step 2: Activate the Door
Press the wall button or remote to begin closing the door.
Step 3: Break the Beam
While the door is descending, wave your hand or sweep a broom handle through the beam path between the two sensors.
Step 4: Observe the Reaction
The moment the beam is broken, the door should stop immediately and reverse to the fully open position. Many openers also emit a clicking sound and flash the courtesy light when the beam is interrupted.
What success looks like: Instant stop and full reversal. The door does not touch your hand or the broom.
What failure looks like: The door continues closing despite the broken beam, reverses sluggishly, or shows no response.
If the test fails, never hold the wall button down to force the door closed. That bypasses the safety system entirely.

Safety Considerations When Choosing Garage Doors
Common Reasons Garage Door Safety Features Fail
If your garage door safety features fail a monthly test, the cause is usually one of these five issues.
1. Misaligned Sensors
Photo-eye sensors must be pointed directly at each other. A slight bump from a bicycle or a child playing in the garage can knock them out of alignment. The LED lights are the easiest diagnostic. If either light is flickering, blinking, or off, alignment is the problem.
Fix: Gently nudge the sensor brackets until both LEDs glow steadily.
2. Dirty Sensor Lenses
Dust, cobwebs, and grease can coat the sensor lenses and block the beam.
Fix: Wipe each lens with a soft, dry cloth.
3. Direct Sunlight Interference
Sun shining directly into a sensor can cause it to misread the beam, triggering false reversals. This is common in garages facing east or west.
Fix: Install sensor sun shields, available from most garage door dealers.
4. Loose or Damaged Wiring
The low-voltage wires connecting the sensors to the opener can become frayed, pinched, or disconnected.
Fix: Inspect the wires for visible damage. If you see fraying or loose connections, call a technician.
5. Worn or Out-of-Calibration Force Settings
The auto-reverse mechanism relies on force-detection settings inside the opener. These settings can drift out of calibration over time.
Fix: Most openers have adjustment knobs on the back or side of the motor unit. If you are uncomfortable making these adjustments, call a certified Raynor technician.
Other Garage Door Safety Features to Inspect Quarterly
Beyond the two federally required features, your garage door system includes several additional components that deserve regular attention.
- Manual release cord. Pull the red emergency release cord to disconnect the door from the opener. Verify it disengages smoothly.
- Springs and cables. Visually inspect for rust, fraying, or visible wear. Never attempt to adjust or replace springs yourself. They are under high tension and can cause serious injury.
- Door balance. Disconnect the opener using the manual release. Lift the door manually to the halfway point and let go. A balanced door stays in place. An unbalanced door slides up or falls.
- Rollers and hinges. Look for cracks, missing screws, or visible wear. Lubricate moving parts annually with a silicone-based garage door lubricant.
- Weather stripping. Check the rubber seal along the bottom of the door for cracks or gaps.
When to Call a Professional to Inspect Your Garage Door?
Some safety issues should never be handled by a homeowner. Stop using the automatic opener and contact a certified technician immediately if you encounter any of these conditions:
- The door fails the auto-reverse test even after force adjustment
- Photo-eye sensors fail consistently despite cleaning and realignment
- You see broken or rusted springs or cables
- The door is visibly off-balance
- The opener makes grinding, banging, or unusual noises
- The door has impacted a vehicle, person, or pet
Springs and cables in particular are responsible for many serious garage door injuries each year. Always leave high-tension components to trained professionals.
How Raynor Door Authority Helps Keep Your Garage Door Safe
Monthly testing catches most safety issues before they become emergencies. When your garage door fails any of the tests above, working with certified Raynor technicians ensures every component is properly calibrated.
Raynor Door Authority has served homeowners across the United States and Canada for over 40 years.
Every repair is performed using premium Raynor and other top-rated products, backed by manufacturer warranties and our satisfaction guarantee. For homeowners who prefer scheduled preventive care, we offer maintenance contracts that include regular safety inspections, lubrication, and component checks.
What You Should Do Next
A 10-minute monthly safety test is the simplest, most effective way to protect your family from garage door accidents. Make it part of your home maintenance routine the way you check smoke detector batteries.
- Schedule a monthly safety check. Pick the first weekend of every month or another consistent date. Test both the auto-reverse and the photo-eye sensors.
- Document any failures. If a test fails, do not use the automatic opener until the issue is resolved.
- Schedule a professional inspection with Raynor Door Authority. Our certified technicians can calibrate, repair, or replace any safety component. We also offer preventive maintenance programs to keep your door running safely between visits.