


Garage Door Opener Maintenance and How Often to Do It
Key Takeaways
1. Garage door opener maintenance is three short jobs: a monthly safety test, a yearly hardware pass, and a rail regrease every two to three years.
2. Garage door opener noise, hesitation, and shrinking remote range all signal something is wearing out or drifting out of adjustment.
3. Raynor Door Authority technicians service the opener and the door as one system, so a single residential service visit catches the balance problems that quietly burn out motors.
What Does Garage Door Opener Maintenance Actually Cover?
Garage door opener maintenance covers three separate systems, and each one wears differently.
- The drive. The motor, its gears, and the rail or belt that pulls the door. This wears under load, and fastest when the door is out of balance.
- The safety circuit. The photo eyes across the opening and the force sensing built into the motor. These need testing rather than lubricating.
- The controls. Remotes, the wall console, the keypad, and the backup battery. These run down on a battery schedule rather than a wear schedule.
Only one of the three wants the spray lubricant most homeowners picture, and the bigger task is keeping the opener from fighting the door.
The Manual Release Test Shows Whether Your Opener or Your Door Needs Work
The manual release test disconnects the opener from the door so you can feel what the springs are doing on their own. It takes under a minute and should open every session. With the door fully closed, pull the emergency release cord hanging from the trolley, then lift by hand.
A healthy door glides up with light effort and stays roughly where you leave it, which means the opener is doing a reasonable amount of work. If it feels heavy, drops, or grinds in the tracks, the springs and cables come first.
Never pull that cord while the door is open. A door with a weakened spring can drop hard enough to cause serious injury.
How Often Should You Service a Garage Door Opener?
Test the safety features monthly, service the door hardware once a year, and regrease the opener rail every two to three years. LiftMaster publishes a residential maintenance schedule built on those same intervals.
| How Often | What to Do |
|---|---|
| Monthly | Run the door by hand to check balance, confirm it opens and closes fully, and test the safety reversal |
| Every six months | Wipe the photo eye lenses, tighten visible hardware, and check remote range |
| Yearly | Oil the door rollers, hinges, and bearings, and test the backup battery |
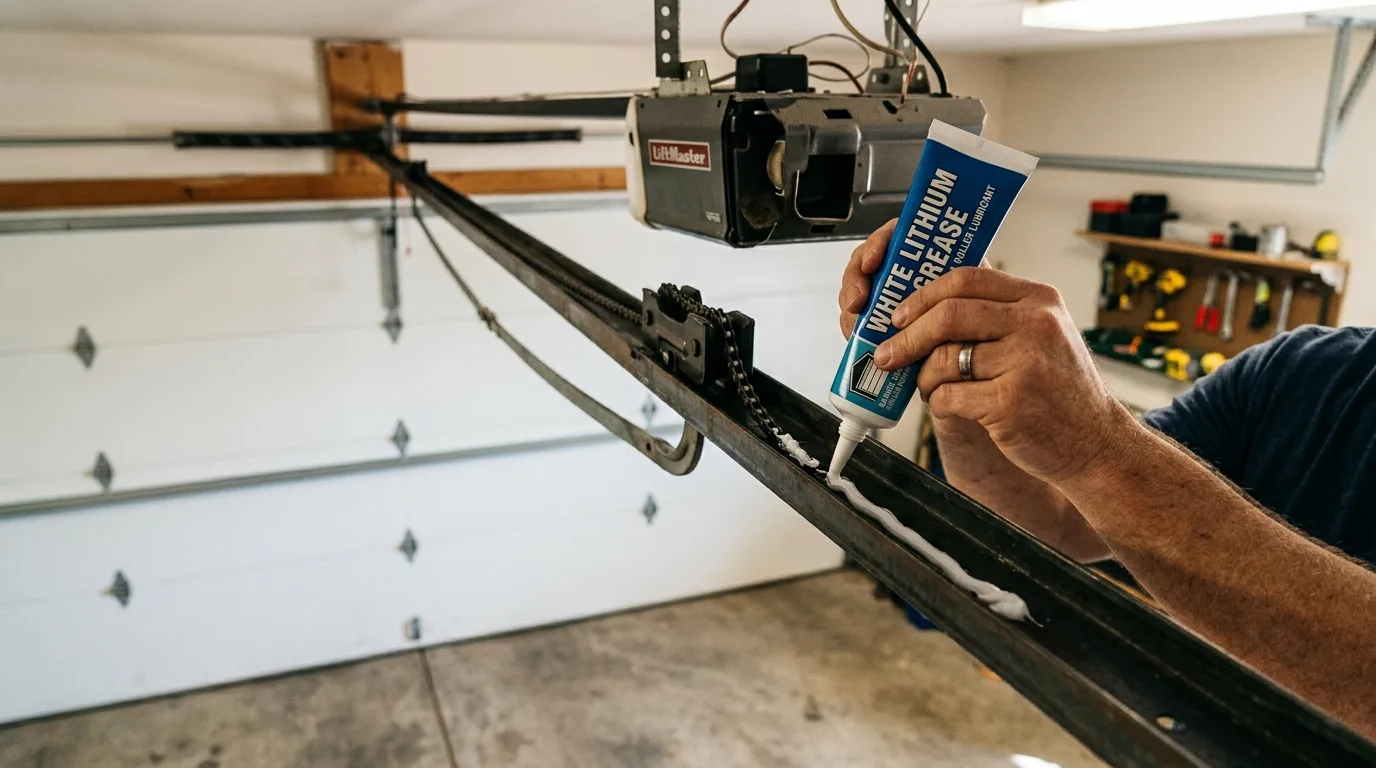
| Every two to three years | Wipe old grease off the opener rail and reapply white lithium grease |
The last interval surprises people. LiftMaster’s residential maintenance schedule says the motor head needs no lubrication beyond that rail, so the opener is close to maintenance-free once the rail is done.
Cycle count matters more than the calendar, so pull every interval forward if your garage is the family’s main entrance. Raynor Door Authority technicians cover the whole schedule in one garage door service visit, including the rail work that needs a ladder.
Which Garage Door Opener Parts Need Grease, and Which Should Stay Dry?
The opener rail is the only part of the opener that wants grease. The tracks, the belt, and the chain links are all better left alone.
- Opener rail, chain and screw drives. Wipe off the old grease, then lay a thin coat of white lithium grease on the top and underside where the trolley slides.
- Belt drives. Leave the belt dry. Lubricant makes it slip and wear faster.
- Door tracks. Clean with a damp cloth and leave dry. Grease makes rollers skid instead of roll, which adds load to the opener.
- Door hardware. Hinges, roller bearings, springs, and end bearing plates take silicone spray or white lithium grease once a year.
Standard WD-40 is the wrong can. It is a solvent, so it strips existing grease and leaves a film that collects dust. Unplug the opener first and work with the door closed. The hardware on the door itself runs on its own garage door maintenance schedule.
How Do You Test Garage Door Opener Safety Sensors and Auto-Reverse?
Two tests confirm the opener will stop for a child or a pet, and together they take about a minute.
Start with the photo eye test. Begin closing the door, then break the beam with a broom handle. The door should stop and return to fully open.
Follow it with the contact reversal test. Lay a flat two-by-four in the door’s path and press close. The door should reverse the moment it touches the wood. The Consumer Product Safety Commission advises running that test monthly, and its garage door safety alert tells homeowners whose openers fail it to repair or replace them with new reversing openers.
Sensor upkeep fixes most nuisance reversals.
- Lenses. Wipe both with a dry cloth, since dust, frost, and cobwebs all scatter the beam.
- Alignment. Both indicator lights should burn steadily rather than flicker, and a bumped bracket is the usual culprit. The Door and Access Systems Manufacturers Association specifies a beam no higher than six inches above the floor.
- Wiring. A staple through the sensor wire kills the circuit even when the lenses look spotless.
If the photo eyes keep reversing the door after cleaning and realignment, stop using it until a technician traces the circuit. An opener predating the 1993 federal entrapment rule should be replaced rather than maintained.
The Complete Guide to Garage Door Maintenance
When Do Garage Door Opener Travel and Force Settings Need Adjusting?
Travel and force settings need attention when the door stops short of the floor, bounces back up after touching down, or leaves a gap at the top.
Travel limits tell the opener where the floor and the header are. Force settings tell it how hard to push before it decides something is in the way. Both drift as temperatures swing and hardware settles, which is why a door that sealed in July can show daylight in January.
Adjustment is model specific, so find the manual for your own unit first. The model number is on a label on the motor housing.
Force is a safety setting rather than a convenience dial. If the door only closes when you crank the force up, you have overridden the protection that stops it on an obstruction, and the real cause is almost always a binding track, dry rollers, or springs losing tension. Retest the auto-reverse after any change.
How Often Does Garage Door Opener Battery Replacement Come Due?
Remote and keypad batteries usually last one to two years, and an opener’s backup battery lasts one to three. None announce themselves, so battery replacement belongs on a schedule.
- Remotes. Coin cells fade gradually, so range shrinks well before a remote quits. Use the exact type printed inside the case and wipe the contacts clean.
- Keypads. Outdoor units drain faster in cold. Check the gasket while the case is open, since moisture kills more keypads than cold does.
- Backup batteries. Test yours yearly by unplugging the opener and running the door on battery power. A backup that fails mid-outage is worse than none, because you were counting on it.
- LED bulbs. Some LED bulbs and shop lights put out radio noise in the band remotes use. If your range dropped after a bulb change, swap it back first.
A surge can also wipe stored codes, and that erase clears your keypad and in-car buttons along with the remotes, so pair everything again in one session.
What Does a Grinding or Rattling Garage Door Opener Mean?
Noise is the earliest signal an opener gives, and the specific sound narrows the cause quickly.
- Grinding with no door movement. The plastic drive gear has likely stripped. Stop running the unit, because each cycle chews the sprocket further.
- Rhythmic slapping. The chain has gone slack and needs tensioning.
- Rattling through the ceiling. Motor mounting bolts or hanging brackets have loosened, and tightening them is a homeowner’s job.
- Motor runs, door stays put. The trolley has been in bypass since the last time someone pulled the release cord. Close the door fully, pull the cord back toward the opener, and run the unit until it clicks into the carriage.
- Burning smell. Unplug the opener immediately and stop testing
A well-maintained opener is quiet, so a change in a familiar door’s sound is a reason to look rather than something to get used to.
Which Garage Door Opener Repairs Should You Leave to a Technician?
Leave springs, cables, the motor’s internals, and sensor wiring to a trained technician.
Two minutes of checking first can save a service call. Test the ceiling outlet, reset the ground fault circuit interrupter (GFCI) and the breaker, look for a lock button lit on the wall console, then power cycle the opener for 30 seconds.
If it still will not respond, garage door opener troubleshooting works through the remaining symptoms one at a time.
Past those checks, the following belong to a professional.
- Springs and cables. The highest-tension parts of the system are the most dangerous garage door repair there is.
- Stripped gears and failed logic boards. Both need the right part for your model.
- Sensors still faulty after cleaning and alignment. The problem is the wiring or the board.
- Burning smells, smoke, or a tripped breaker. Unplug the unit, and call Raynor Door Authority for emergency repair if the door is stuck open overnight.
Should You Repair or Replace an Aging Garage Door Opener?
Repair usually wins on a unit under about ten years old when the failed part is discrete and still available. Replacement usually wins when the fault sits inside the motor head of an older opener.
| Factor | Points to Repair | Points to Replacement |
|---|---|---|
| Age | About 10 years | 15 years or more |
| Failed part | Gear, sprocket, capacitor, or sensor still stocked | Logic board or motor, discontinued model |
| Safety | Photo eyes passing both tests | Built before 1993, or still failing |
| Cost | Well under a new installed unit | Approaching a new installed unit |
| Features | Acceptable noise, rolling-code security | Chain drive by a bedroom, no battery backup |
Most openers give 10 to 15 years, which is exactly the band where age alone decides nothing. Inside it, the failed part settles the question: a gear, sprocket, or sensor is worth fixing on a 12-year-old unit, while a logic board or motor on that same unit is money spent on a machine already near the end.
When replacement is the answer, drive type and noise matter more than horsepower. Choosing a garage door opener is mostly a decision between chain, belt, screw, and wall-mount units.
How Raynor Door Authority Keeps Garage Door Openers Running
Opener maintenance and door maintenance are the same appointment, which is the part homeowners rarely see coming. Raynor Door Authority has served both as one system for more than 40 years across the United States and Canada.
- Certified technicians. Our teams train on entrapment protection and safety standards, not just on swapping parts.
- Every major brand. We repair openers regardless of who built them.
- Emergency response. Round-the-clock help when a dead opener leaves your home exposed.
- Straight answers on cost. When a unit is past saving, we say so, and the quote comes before the work.
What You Should Do Next
Opener maintenance rewards a short, repeatable routine more than a big annual effort. Start here.
- Run the manual release test to confirm the door is balanced, then test the photo eyes and the contact reversal. Put both safety tests on a monthly reminder.
- Every six months, wipe the sensor lenses, tighten visible hardware, and check your remote range. Replace the remote batteries and test the backup battery once a year.
- Contact your nearest Raynor Door Authority location to book a visit for anything the checklist turns up.
FAQs